TL;DR
A closet setup can be a great budget solution for voice and light recording, but it needs smart placement, sealing, and damping. Distance and careful treatment trump cheap foam for noise control, and proper airflow prevents overheating while keeping noise low.
Ever noticed how a tiny closet can sound like a box of cobs? That echo, the harsh reflections, the muffled noise leaking out. It’s a common problem for anyone trying to squeeze a studio into a tiny space. But here’s the truth: the best way to improve sound isn’t just more foam—it’s where you put the rig, how you seal it, and how you manage heat.
This article cuts through the noise and shows you real, practical steps to turn a cramped closet into a usable, quiet workspace. Whether you’re recording vocals, running inference tasks, or just want less echo, these tips will help you create a better environment—without tearing down walls.
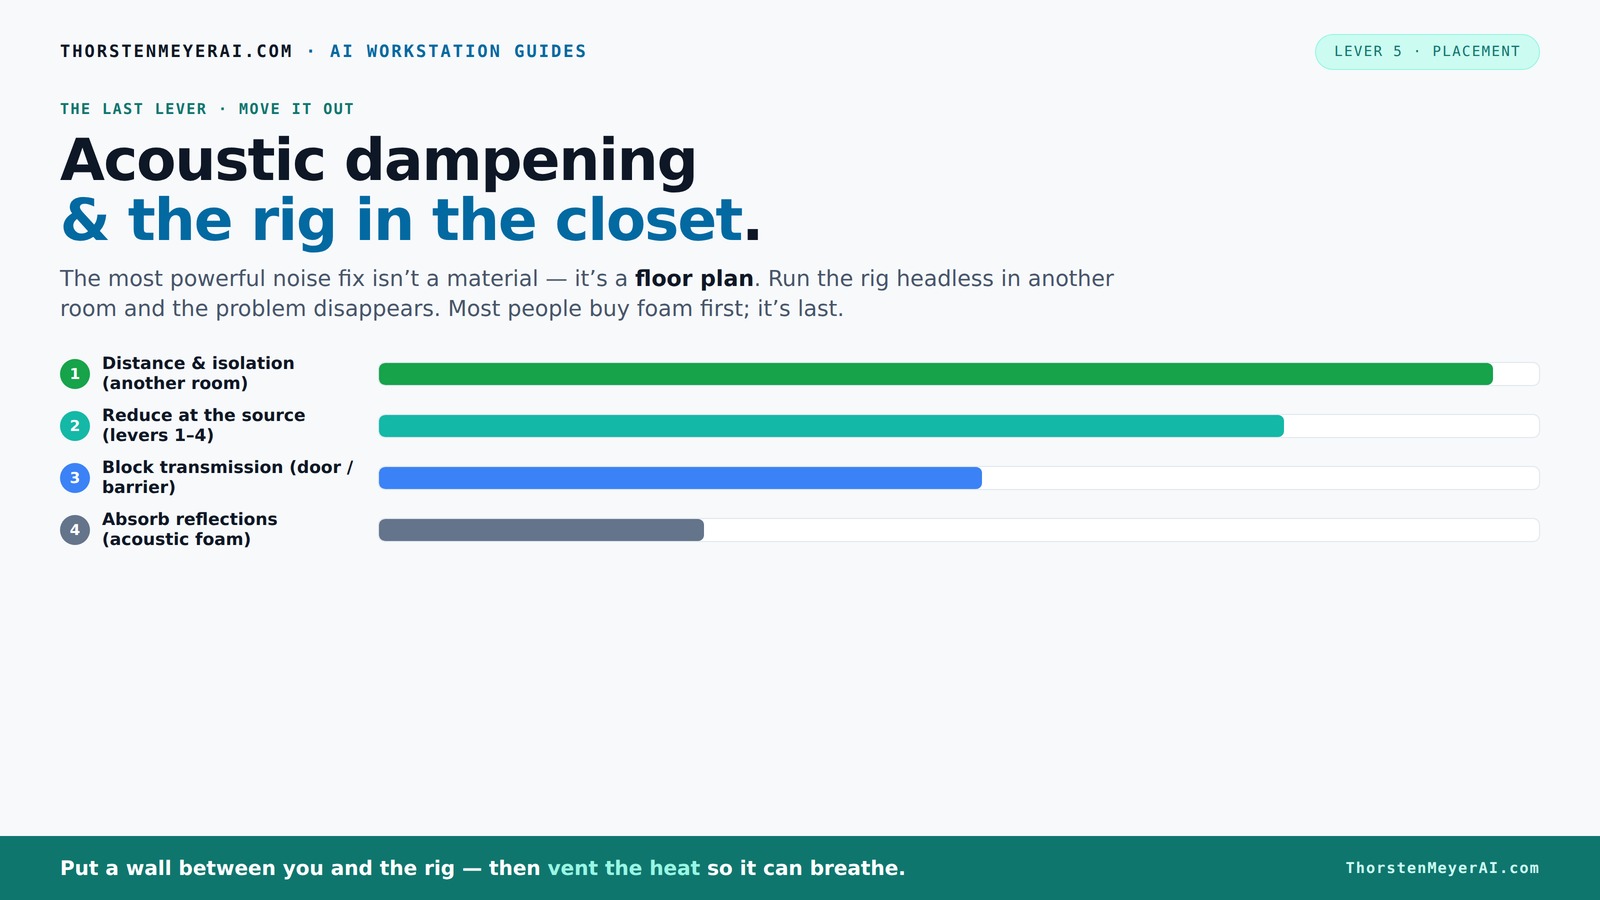
Acoustic dampening
& the rig in the closet.
The most powerful noise fix isn’t a material — it’s a floor plan. A rig you can’t hear because it’s in another room beats any amount of foam. Tap the approaches in Part 1 to see what actually works.
(another room)
(levers 1–4)
(door / barrier)
(acoustic foam)
Contain the noise, not the heat
Key Takeaways
- Distance your rig from your workspace. It’s the most effective noise reduction.
- Treat reflection points first—use the mirror trick to find where sound bounces.
- Seal all gaps and cracks around the door and outlets to stop leaks.
- Add bass traps in corners if low-frequency buildup causes muddy recordings.
- Ventilate the closet properly to prevent heat buildup, using ducting or quiet exhaust fans.

Focusound 52 Pack Acoustic Foam Panels 1" x 12" x 12" Sound Proof Foam Panles Soundproofing Noise Cancelling Wedge Panels for Home Office Recoding Studio with 300PCS Double-Side Adhesive
Soundproofing - Acoustic foam panels triangular grooves structure for better noise absorption, helps to reduce and absorb unwanted...
As an affiliate, we earn on qualifying purchases.
As an affiliate, we earn on qualifying purchases.
What 'Rig in the Closet' Really Means—And Why It Works
Putting your computer or audio gear in a closet isn’t just for saving space. It’s a smart move to cut down on noise and reflections. Think of it like a mini sound booth—if you treat it right.
The key is that your rig doesn’t have to sit in your workspace. With a wired connection or a fast Wi-Fi, you can run intense AI models or record vocals from another room. The closet becomes a dedicated zone for heat and sound, leaving your desk clear and silent.
For example, many content creators put their noisy gaming or AI rigs in a closet, then access them over the network. It’s a simple shift that makes a huge difference in noise and heat management.

2 Pack Studio Monitor Isolation Pads for Large Speakers Sound Insulation Studio Foam Prevents Vibrations Acoustic Speaker Isolation Pad High Density Fits Most Stands
Enhanced Sound Clarity: Saiqiang speaker isolation pads can reduce vibrations and resonance, providing cleaner, more accurate sound from...
As an affiliate, we earn on qualifying purchases.
As an affiliate, we earn on qualifying purchases.
Acoustic Dampening vs. Soundproofing—What’s the Difference?
Acoustic dampening and soundproofing often get lumped together, but they’re different. Dampening reduces echo and reflections inside a space. Soundproofing blocks sound from leaking outside.
In a closet, dampening means putting up foam or panels where sound bounces—like walls and ceiling. Soundproofing involves sealing gaps and adding mass, like extra drywall or dense mats, to stop noise from escaping.
For instance, foam panels on the side walls will soften reflections—making your voice clearer—but won’t stop your neighbors from hearing the GPU’s hum. To contain that, you need sealing and barriers.
Understanding these differences is crucial because it influences your choices and budget. Over-investing in foam for soundproofing won’t help if you leave gaps or leaks. Conversely, sealing gaps without damping inside won’t reduce echo, making recordings sound harsh. The tradeoff is that true soundproofing is often more expensive and invasive, while damping is more about improving the internal acoustics. Balancing both based on your needs and budget is key to an effective setup.
Focusound 52 Pack Acoustic Foam Panels 1" x 12" x 12" Sound Proof Foam Panles Soundproofing Noise Cancelling Wedge Panels for Home Office Recoding Studio with 300PCS Double-Side Adhesive
Soundproofing - Acoustic foam panels triangular grooves structure for better noise absorption, helps to reduce and absorb unwanted...
As an affiliate, we earn on qualifying purchases.
As an affiliate, we earn on qualifying purchases.
Where to Place Acoustic Panels in a Closet for Best Results
Placement is everything. Acoustic panels shouldn’t just be slapped on the wall randomly. Focus on the reflection points—these are spots where sound bounces directly into your ears or microphone. Use the 'mirror trick': sit in your usual position and have a friend move a mirror along the walls. Where you see the panels, you should place your absorption material.
Use the 'mirror trick': sit in your usual position and have a friend move a mirror along the walls. Where you see the panels, you should place your absorption material. Common spots are the side walls at ear level, behind the mic, and sometimes the ceiling.
Adding panels here cuts down on echo and harshness, making your recordings or inference sessions cleaner and clearer. But it’s also important to consider the room’s specific acoustics. For example, if your closet has a low ceiling or unusual corners, adjusting panel placement to target these areas can prevent sound from bouncing around unpredictably. The goal is to break up the primary reflection paths that cause muddiness and harshness. Proper placement maximizes the effectiveness of your dampening efforts and avoids unnecessary clutter or expense.

Versare VersiPanel Acoustical Partition Wall - Sound Panel Classroom Office Room Divider, Flexible Arrangement, Easy Roll-up Storage (Gray, 8'Wide x 6'6"Tall)
ACOUSTIC: These portable partition walls are constructed with acoustical ribbed fabric and heavy foam cores.
As an affiliate, we earn on qualifying purchases.
As an affiliate, we earn on qualifying purchases.
Do You Need Bass Traps in Your Closet Studio?
Yes, if you’re noticing boomy low frequencies or standing waves, bass traps are your friends. They sit in corners and absorb low-end energy that tends to build up in small spaces like closets.
In a tiny room, bass can make your recordings muddy or cause the space to sound hollow. Installing foam bass traps in the corners can make a big difference—especially if you’re doing voice work or critical listening.
However, it’s important to understand that bass trapping isn’t just about stuffing foam into corners. Properly installed traps that are dense enough and placed strategically can significantly improve low-frequency response. This reduces muddiness and ensures your recordings sound tight and professional. The tradeoff is that bass traps can be more costly and tricky to install effectively, especially in small, irregularly shaped spaces. But ignoring them often results in a thin or boomy sound that’s hard to fix later, so they’re worth the investment if you’re serious about quality.
How Much Coverage Do You Need? The Surprising Answer
More panels aren’t always better. The key is treating the right spots, not covering every inch. Focus on reflection points, corners, and the door area. For more tips, see our guide on acoustic dampening.
Start with about 30-50% coverage—adding panels to the primary reflection points and corners. Use a mirror trick to find those spots, then add more if echo persists.
But understanding the tradeoff is crucial: over-treating can make a space sound unnaturally dead, reducing the room’s natural liveliness and making recordings sound dull or boxy. Under-treating leaves echoes and reflections that muddy your sound. The goal is to strike a balance—enough treatment to control problematic reflections without sacrificing natural sound. This means prioritizing critical reflection points and corners first, then evaluating whether additional panels are necessary. Properly balanced coverage ensures clarity without sacrificing the natural character of your recordings.
Sealing Gaps and Cracks—Small Mistakes That Ruin Your Quiet Space
Even the best panels won’t help if sound leaks through gaps. Sealing cracks around doors, outlets, and vents is crucial. Use weatherstripping or foam tape to block these leaks. For more on sealing and setup, visit acoustic dampening, placement, and the 'Rig in the Closet' guide.
For example, sealing the door gap and covering outlets with acoustic gasket material can cut noise escape by up to 50%. In a closet, every little crack counts.
Additionally, unsealed gaps can allow air drafts, which can introduce unwanted noise and affect your equipment’s temperature. Proper sealing not only enhances soundproofing but also maintains a stable environment for your gear. It’s a small investment with a big impact—ensuring that your quiet space remains truly quiet and that your equipment operates in optimal conditions. For more detailed tips, check out the full guide on acoustic dampening and setup. leaks that are hard to eliminate later, so take the time to seal everything thoroughly.
How to Keep Your Closet Rig Cool Without Noise
Putting a hot, high-load rig in a closet creates a heat trap. To keep it cool, you need ventilation—quiet airflow, not just fans blaring. Use passive vents or low-noise exhaust fans to move hot air out.
In practice, a small duct or a thermostat-controlled exhaust fan can prevent overheating. An active ventilation system with ducting and soundproofing keeps noise low while pushing heat out.
Choosing the right ventilation method involves balancing noise levels with cooling efficiency. Passive vents are silent but may be less effective in very hot environments, while active fans can move significant air but need to be carefully soundproofed to avoid introducing noise. Some setups incorporate duct mufflers or inline fans with sound dampening features to achieve both cooling and quiet operation. Proper ventilation not only prevents thermal shutdowns but also maintains consistent performance, especially during extended use. The tradeoff is cost and complexity, but neglecting proper cooling can lead to overheating and reduced hardware lifespan, making this an essential part of your setup.
The 'Rig in the Closet' Setup—Balancing Noise, Heat, and Space
Sealing a closet and adding ventilation is a balancing act. You want quiet, cool, and accessible. Use soundproof panels, bass traps, and sealing to reduce reflections and leaks. But also, plan for airflow to avoid overheating.
Invest in purpose-built soundproof cabinets or DIY solutions like ducting and insulation. For example, a small closet with foam panels, bass traps, and a thermostatic exhaust fan can keep the rig cool and quiet for 24/7 operation.
Remember, the goal isn’t to make it silent—just quiet enough to not bother you or your neighbors. Achieving this balance involves understanding the tradeoffs: better insulation and sealing can restrict airflow, so integrating a well-designed ventilation system is essential. Proper planning ensures your setup remains both effective and sustainable, allowing continuous operation without overheating or excessive noise. It’s about creating a harmonious environment where heat and sound are managed intelligently, rather than just trying to eliminate all noise or heat completely, which is often impractical.
Frequently Asked Questions
What is the difference between acoustic dampening and soundproofing?
Acoustic dampening reduces echoes and reflections inside a space, making sound clearer. Soundproofing blocks sound from escaping or entering, stopping noise leaks. In a closet, both are needed but serve different roles.Where should acoustic panels go in a closet?
Place panels on reflection points—like the side walls at ear level, behind the mic, and sometimes the ceiling. Use the mirror trick to find these spots for maximum effectiveness.Do I need bass traps in my closet studio?
Yes, especially if you notice low-frequency muddiness or standing waves. Bass traps in corners absorb low-end energy, making your recordings tighter and clearer.Will foam panels make my closet soundproof?
No. Foam reduces echo inside the closet but doesn’t block sound leaks. To contain noise, you need sealing and barriers, not just foam.How do I stop echo in a small closet?
Treat reflection points with panels, add bass traps if needed, and use soft furnishings like rugs or moving blankets. Proper placement makes a huge difference.Conclusion
Thinking of a closet as a studio? It can work—if you treat it like a tiny, controlled environment. Focus on placement, sealing, and ventilation, and you’ll get cleaner sound and less noise leakage.
Remember, the best noise solution isn’t just foam—it's smart positioning and good airflow. Your closet might just become your secret weapon for high-quality voice or AI work.